top of page

WHEAT, A 1990s PHOTOGRAPHIC ESSAY


The Weald & Downland Living History Museum’s wheat stacks circa 1995. The author is standing on the left. The Museum’s cattle are of the Sussex breed with the animal on the left being one of the then team of oxen.

INTRODUCTION

From 1990 to the end of 1996, I had the honour to be Curator at the Weald & Downland Open Air Museum, Singleton, West Sussex under the Directorship of Chris Zeuner. The Museum is now known as the Weald and Downland Living Museum.

The Museum’s annual activities included the growing of long straw wheat. The principal wheat grown was “Maris Widgeon”, a commercially available long straw variety. Some heritage varieties such as “Red Standard” and once local “Chidham” were tried but were unsuccessful. The “Maris Widgeon” wheat grain was suitable for stone ground milling into flour in the Museum’s Lurgashall Watermill. However, the wheat straw was the principal objective: a valuable resource for both thatching and raising income for the Museum. In 1996 the Museum grew 23 acres of wheat for thatching straw. Some was grown on the Museum’s site with the assistance of the adjacent West Dean Estate and some locally with the assistance of Museum supporter Lady Elizabeth Benson at “Cucumber Farm”, Singleton.

The following comprises photographs that I mainly took in 1995 and 1996 of harvesting of the wheat onwards through to stacking, threshing and thatching.

PLOUGHING and SOWING

Some of the Museum’s preparatory ploughing was done during the autumn threshing and horse ploughing event. However, although the Museum had its own horses, much of its ploughing was done by tractor, principally by John Mills, the West Dean Estate’s farm manager, who also sowed the wheat. On Lady Elizabeth Benson’s “Cucumber Farm” tractor assistance was given by David Penny.


My good friend and great Museum supporter, the late Rob Dash ploughing with his team of “Ben” and “Truman” during the Museum’s autumn horse ploughing and threshing event.

Even the author ploughed a furrow or two, seen here Alick Deadman’s team.

REAPER-BINDER HARVESTING

The Museum had its own working Shire horses, but they were not always used on the reaper-binder or “Binder” which was used to both cut and tie the wheat into sheaves.


Peter Albon on the Museum’s Albion 5a binder being drawn by Museum supporter Clive Kennett’s Clydesdales “Bonnie” and “Clyde”.

The harvesting of the wheat proceeds as Clive Kennett’s Clydesdales draw the Museum’s Albion 5a binder. The twine-bound sheaves of wheat lay on the ground; ready to be set up in “stooks” or “shocks”.

Andrew Hodby drives the Museum’s Ferguson TE20 tractor while Peter Albon rides and controls the Alf Pilcher’s binder.

Dave Gabbitas drives his 1950s Fordson ‘Dexta’ tractor while Albert Peacock rides and controls Dave’s binder as it ejects twine-bound sheaves of wheat.

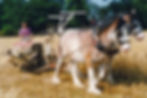
CUTTING and BINDING the SHEAVES

As the bound sheaves were ejected from the reaper-binder, they were manually stood up in “A” shaped “stooks” or “shocks” of usually eight sheaves; where they would be left to dry and mature until it was time to cart them off the field for stacking.


As the reaper-binder cuts into the standing wheat, the sheaves are ejected in rows ready to be set or stood up into stooks or shocks.

The view from already stood up “stooks” or “shocks” of the wheat sheaves; looking towards the “binder” that is continuing to cut and bind the crop into sheaves.

‘STOOKING’ or ‘SHOCKING’


Ron Betsworth stooking or shocking the wheat sheaves into “A” shaped stooks or shocks of eight sheaves. The stooks would traditionally be lined up with the under passage in line with the prevailing wind to aid drying.

CARTING


When it was time to start stack building by carting the sheaves off the fields, all the Museum’s available vehicles were used. Here is “Rosie” (shafts) and “William” (trace) on the Museum’s “stone cart.” The Museum’s waggon is in later pictures.

The Museum’s boat waggon being used to cart wheat sheaves to build a stack in 1994. “Gym” is in the waggon’s shafts and “William” the trace horse.

STACKING This is the systematic method of placing sheaves to build a “stack” that will store and protect them until threshing.


Albert Peacock (left) and Les Whitecall lay out the protective bed of loose straw on which the stack will be built. The Museum usually built circular stacks, but they could also be oval.

Albert Peacock does one of the most important jobs, that is building up the middle first with a core of sheaves that slope down to the stack’s circumference. My mentors always drummed into me: “Keep the middle up boy!” In each layer of sheaves, they had to slope outwards and down from the centre. If they sloped inwards and down to the centre any ingress of moisture (rain) would run down the straw into the stack, threatening mould and rot.

In building the stack, the first layers of sheaves are easily managed from both the ground and carting vehicle. The sheaves are always laid in a circular motion with the “butt” end to the outside, keeping the ears of grain laid inwards towards the stack’s centre. As the sheaves are laid inwards to the centre, they are laid half over to the previous row’s sheaves bonding twine. This locks them together and helps keep the middle higher as you work towards the centre.

As the stack gets higher a stack elevator is brought in to aid lifting the sheaves. This elevator is “The Unique” model made by Carter Bros. Ltd., at their ‘Reliance Works’, Billingshurst, West Sussex.

Here the roof of the stack has begun, with the first layer of sheaves slightly overhung to create the eave, and the consecutive layers being gradually drawn in.

Getting close to finishing the stack’s roof.

The as yet unthatched stack is finished as a load of sheaves for the next stack is nearby.

The completed stack prior to thatching.

PREPARING the stack’s THATCHING STRAW

Thatching the stack with a weatherproof coating is critical to helping protect the sheaves until threshing time. Included in the picture is pulling straightened handfuls of straw from a bed of wetted loose straw; a forked hazel being filled with straightened straw to create a bundle of straw or “yelm” for use by the thatcher; a bundle of cleft hazel thatching spars or pegs (made by Albert Peacock) for holding the thatch on and, stuck in the straw bales a straw weathercock weathervane of which more later.

The first task is to prepare the stack’s thatching straw. As shown, a large bed of loose wheat straw is made which is wetted overnight to make it more manageable. From the loose straw Les Whitecall pulls handfuls of straw from the bed, which he straightens and lays out in a row of straightened stalks.

Les Whitecall (ex-farm carter and Museum horseman) fills a fork of hazel wood, with straightened straw pulled from the bed in the foreground to create a “yelm” for thatching. The forked hazel is stood against a cleft chestnut gate hurdle. When the fork is full it can be closed tight by a twine loop holding the two springy ends together. At that point the filled fork can be carried up the stack with the “yelm” of straw ready for the thatcher to use.

MAKING THATCHING SPARS


Whether on a stack or a building’s roof, “spars” made from cleft hazel rods were essential for holding on the thatch. At the Museum, thatching spars were made by Albert Peacock who used to have to make them as a boy before he went to school. In the left picture above, Albert is splitting the hazel rods with a small adze that depending on which way he levered cleft the rod along the natural grain into four pieces. As shown, Albert is splitting on the top of a large post to which a tied on smaller rod helps keeps the cleft hazel open until it splits. Once the spars were cleft, as in the right picture and the main picture, they had to be pointed at both ends by a sharp bill hook. Each completed bundle of spars contained 250 spars and Albert could make up to four bundles per day.

In the main picture (following), Albert is sitting on bundles of finished spars as well as a bundle of hazel rods waiting to be cleft. In front of Albert is a pile of cleft spars that he has yet to point.


In use, the pointed spars had to be bent into a “U” shaped staple. However, they could not be just bent without breaking. Instead, they had to be manually twisted in the middle to loosen the hazel’s fibres which allowed them to be bent without breaking which also increased their strength.


THATCHING the STACK


Dave Gabbitas thatches the stack in concentric layers with “yelms” straw. As he uses one “yelm”, Les Whitecall fills the hazel fork with pulled and straightened straw to create the next “yelm”.

Above you can see the straw “yelm” above Dave Gabbitas’ back. As Dave lays the straw onto the stack’s roof, he brings a continuous length of twine across the straw. Next, above his hands are the thatching spars that will be twisted and bent into a “U” shape before being pushed upwards into the thatch over twine that also holds the thatch on. The spars are pushed upwards to, again, ensure any external moisture runs out and not into the stack.

Once the thatching of the stacks is completed, the thatch that creates the eave of the roof is trimmed, as are any untidy parts of the stack’s wall. An eaves knife is done for this job. Sticking out sheaf butts from the stack’s wall may also be beaten into place by a flat board on the end of a long handle. This is the Museum’s Sussex waggon with “Rosie” in the shafts and “William” as trace horse. The waggon’s corner poles increase the load capacity for sheaves and hay. Note the weathercock weathervane on the left-hand stack.

A WEATHERCOCK WEATHERVANE

In circa 1980 I learned how to make weathervanes from wheat straw for adorning the top of stacks from one of my mentors, Andrew Green from Benwick, Cambridgeshire who was born in 1902. As in the previous photo, I made one for one of the stacks. This is a cockerel but it could be a fox or any ornament that would turn in the wind.


Not the prettiest weathercock but the detail is not seen from the ground! The cockerel’s body is built around the neck of a whisky bottle with the rim to the bottom. As shown a nail is put through, near to the top of a length of hazel rod; with a washer on the nail to act as a pivot for the weathercock to turn on in the wind. The hazel rod is sharpened on the lower end for spiking into the top of the stack.

Dave Gabbitas having spiked the weathercock weathervane into the top of the stack.

THRESHING

Threshing is the process of removing the grain from the “ears” at the top end of the straw. In October, coinciding with the annual horse ploughing event, the threshing of the wheat was a major Museum event. For the event, the threshing “drum” (machine) was driven by steam.


The threshing “tackle” equipment is set up next to the first stack to be threshed. The traction engine belt drives the threshing drum, as the sheaves are fed into the top of the drum from the stack. Here the threshed grain is taken from the thresher by a grain elevator directly into the blue grain trailer pulled by the Leyland tractor. More commonly the grain would have been fed into “quarter” sacks holding 4 “Bushels” or 2.25 Cwt (252 Lbs) at the end of the thresher. The threshed straw passes through the drum to the opposite end.


The steam threshing contractors were Messrs Dibben from Hampshire. The threshing machine or “drum” was made by William Foster & Co. Ltd from Lincoln who were associated with building First World War tanks. The steam traction engine was made by Wallis & Stevens of Basingstoke, Hampshire.

“COMBED WHEAT REED” STRAW

Instead of the straw coming randomly out of the threshing drum, it had a “comber” added which combed or straightened the threshed straw into tied bundles. This premium straw was called “wheat reed” because like naturally harvested thatching reed, it was straight and ready to be applied to a roof. The combed wheat reed had extra longevity compared to straw that had to be manually pulled. Combed wheat reed might last for 25 years.


The threshing machine’s “wheat reed comber” with a tied bundle about to be ejected.

Andy Hodby waits for wheat reed bundles. Note that the thresher still ejects non-combed straw.

THATCHING


Chris Tomkins thatching the Museum’s 17th Century ‘Walderton House’ in 1996 using some of the Museum’s “combed wheat reed.”

Dave Gabbitas thatching the Museum’s Littlehampton Granary with wheat straw that he has hand pulled.


© Bob Powell, November 2021

Bob.powell53@btopenworld.com

bottom of page